Real Time Video Analysis in Python Part 3 (Multi threading)
Creating a simple Python pipeline for video analysis
Introduction
In our part 1 and part 2 we described the problem of building a video analysis pipeline in Python and we started to build a simple pipeline which we faced a blocking behaviour due to a slow consumer. In this post we’ll go through implementing a multi threaded pipeline and a pipeline with queues. We’ll also talk about some of the challenges that we’ll face and how to overcome them as part of that we’ll learn about the mysteries of Python GIL and its limitations.
Introduction to threads
If already know about what threads are please skip this part and go to the next section. If you are not familiar with threads, here is a quick introduction. A thread is a sequence of instructions that can be executed independently of other code. A thread is also known as a lightweight process. A thread is a component of a process. A process can have multiple threads. Threads share the same memory space and resources. Threads are scheduled by the operating system.
Here is what you need to know about threads:
- General-purpose solution for managing concurrency.
- Multiple independent execution streams.
- Has shared state.
- Pre-emptive scheduling.
- Synchronization (e.g. locks, conditions).
If you are interested to understand more about threads in operating systems I suggest reading Mach: A New Kernel Foundation For UNIX Development by Richard Rashid and Avadis Tevanian, published in 1986. This paper introduced the concept of lightweight threads, also known as threads or threads of control, within the context of the Mach operating system.
The paper highlights the benefits of using threads, such as increased responsiveness, improved performance, and better resource utilization. It also covers various aspects of thread management, including thread creation, synchronization, and communication mechanisms.
Why Threads Are A Bad Idea (for most purposes)?
I also sugges everying to ready Why Threads Are A Bad Idea (for most purposes) by John Ousterhout. This paper is a great read and it highlights the challenges of using threads. However we are going to give it a shot and see how it goes.
Threads in Python
Threads in Python are very easy to use. You can create a thread by creating an instance of the Thread class and passing a function to it. Here is an example:
import threading

def hello_world():
    print("Hello World")

thread = threading.Thread(target=hello_world)
thread.start()
You can also use a ThreadPoolExecutor to manage your threads. Here is an example:
from concurrent.futures import ThreadPoolExecutor

def hello_world():
    print("Hello World")

with ThreadPoolExecutor(max_workers=10) as executor:
    executor.submit(hello_world)
Threads in Python are not real threads
Threads in Python are not real threads. They are just a way to run multiple Python interpreters in the same process. This is due to the Global Interpreter Lock (GIL). The GIL is a mutex that protects access to Python objects, preventing multiple threads from executing Python bytecodes at once. This means that Python threads are not suitable for CPU bound tasks. However they are suitable for IO bound tasks. This is because the GIL is released when a thread is waiting for IO. This means that if you are doing a lot of IO in your thread, you can benefit from using threads. However if you are doing a lot of CPU bound tasks in your thread, you won’t benefit from using threads. In fact you’ll see a performance degradation due to the overhead of managing threads. This is why we don’t recommend using threads for CPU bound tasks.
When doing computer vision tasks, we are usually doing a lot of CPU bound tasks. This means that we won’t benefit from using threads. However we’ll still use threads to see how it works and what challenges we’ll face.
Context switching between threads in python takes around 50 microseconds. This means that we can do around 20,000 context switches per second. This is not a lot. This is why we don’t recommend using threads for CPU bound tasks.
Multi threading pipeline
Lets start by creating a multi threading pipeline. We’ll use the same pipeline that we created in part 2. We’ll create a ThreadedPipeline class that will be responsible for initialising our components and connecting them together. We’ll also use this object to start and stop the pipeline. Here is what the code could look like:
from concurrent.futures import ThreadPoolExecutor

from component import Component


class ThreadedPipeline:
    def __init__(self):
        self._components = {}
        self._pool = ThreadPoolExecutor(max_workers=10)

    def add_component(self, component: Component, parent=None):
        if parent is None:
            self._components[component] = []
        else:
            self._components[parent].append(component)
        return self

    def publish(self, component: Component, data):
        for child in self._components.get(component, []):
            child.on_data(data)

    def start(self):
        for component in self._components:
            component.set_pipeline(self)
            self._pool.submit(component.start)

    def stop(self):
        for component in self._components:
            component.stop()
We’ve created a ThreadPoolExecutor with 10 workers. We’ve also used the submit method to submit the start method of our components to the thread pool. This will start our components in different threads. This means that our components will run in parallel.
also created threaded_app.py as follows:
from debugger import Debugger
from mock_camera import MockCamera
from pipeline import Pipeline
from slow_consumer import SlowConsumer
from threaded_pipeline import ThreadedPipeline

camera = MockCamera('/Users/bamdad/Downloads/pepsi-max.png')
debugger = Debugger()
slow_consumer = SlowConsumer()
ThreadedPipeline() \
    .add_component(camera) \
    .add_component(slow_consumer, parent=camera) \
    .add_component(debugger, parent=camera) \
    .start()
Output looks like this:
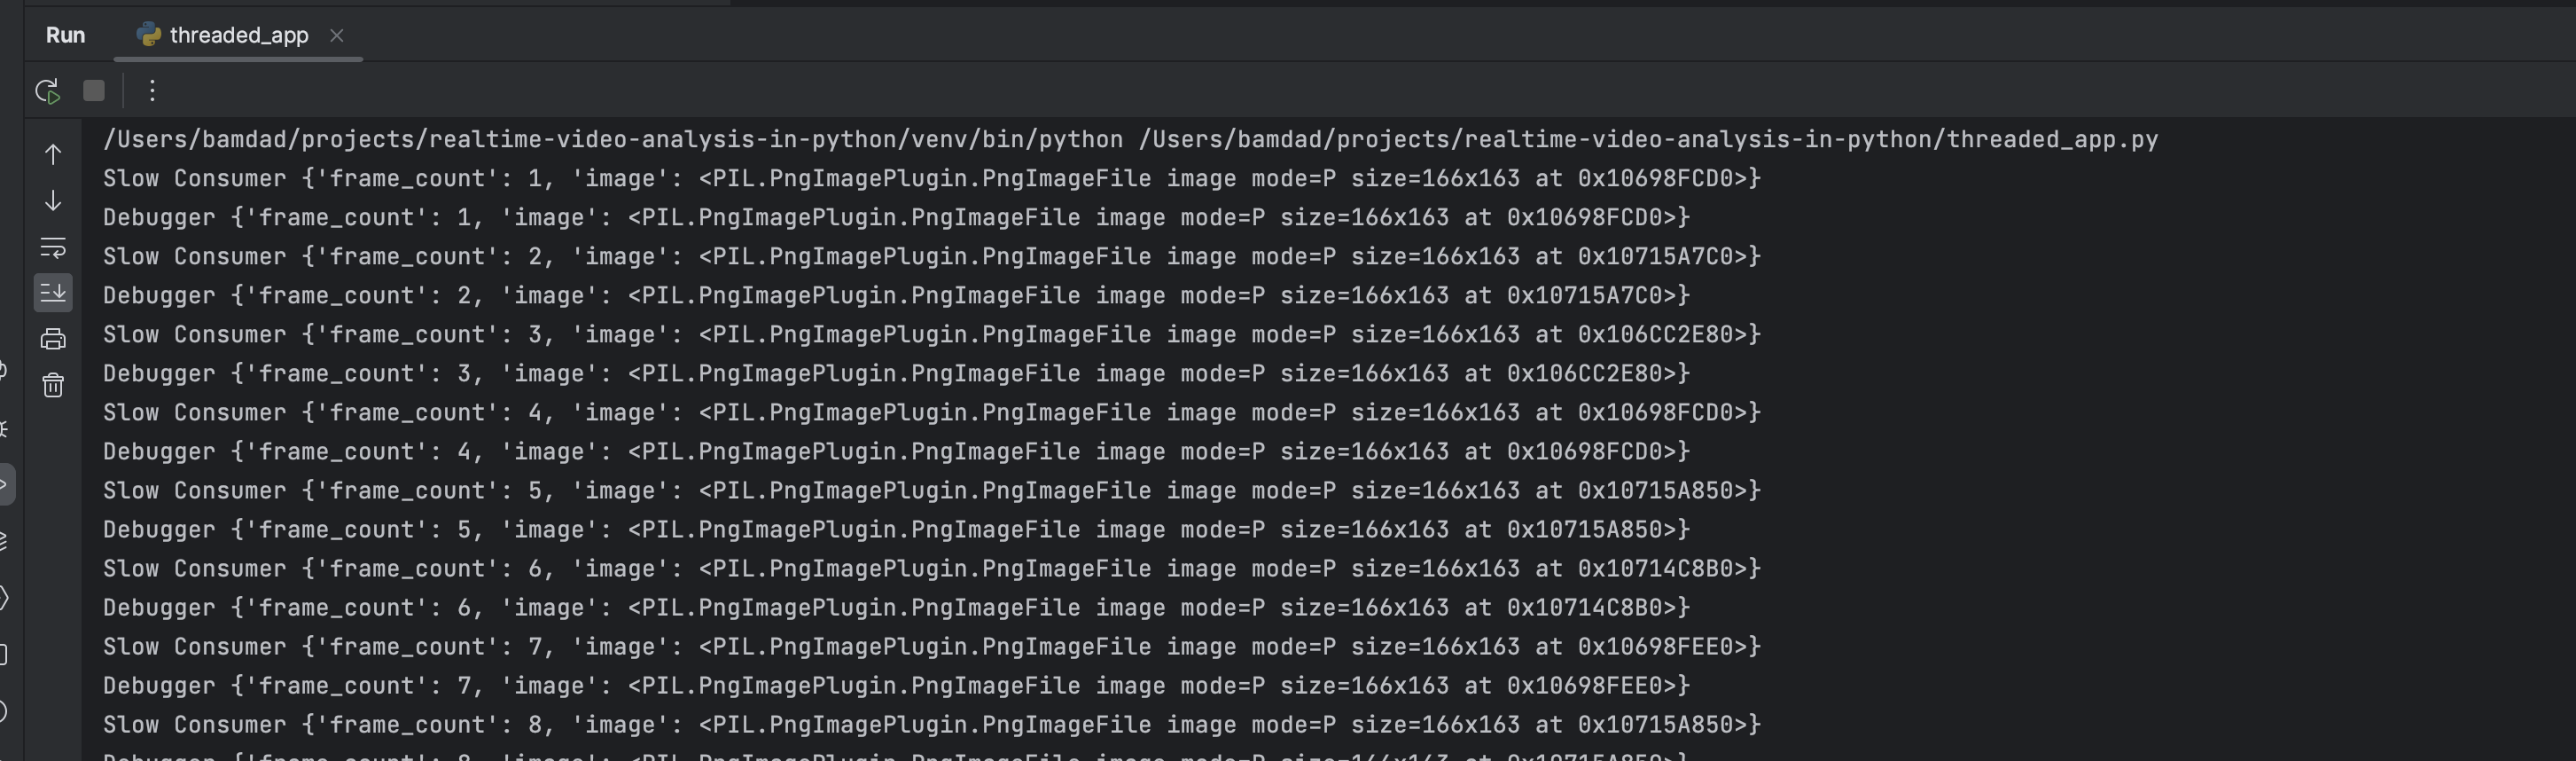 When we run this code we still see the same blocking behaviour. I was exepecting debugger componenet to log more often than the slow consumer component. However this is not the case. This is because the GIL is not released when we are doing CPU bound tasks. This means that the slow consumer component is still blocking the debugger component. Lets see if we can bypass this
Multi threading pipeline with slightly more concurrency
Lets adjust our code a bit to add more concurrency to our solution:
from concurrent.futures import ThreadPoolExecutor
from typing import Type

from component import Component


class ThreadedPipeline:
    def __init__(self):
        self.component_configs = {}
        self.components = {}
        self._pool = ThreadPoolExecutor(max_workers=10)

    def add_component(self, component: Type[Component], arguments={}, parent=None):
        if parent is None:
            self.component_configs[component] = {"arguments": arguments, "children": []}
        else:
            self.component_configs[parent]["children"].append([component, arguments])
        return self

    def publish(self, component: Component, data):

        children = self.component_configs.get(type(component)).get("children", [])
        for child in children:
            child_class = child[0]
            child = self.components.get(child_class)
            if child:
                self._pool.submit(child.on_data, data)


    def start(self):
        for component_cls in self.component_configs:
            arguments = self.component_configs[component_cls]['arguments']
            def init_component(component, arguments):
                c = component(**arguments)
                c.set_pipeline(self)
                self.components[component] = c
                c.start()
            self._pool.submit(init_component, component_cls, arguments)
            for child in self.component_configs[component_cls]["children"]:
                self._pool.submit(init_component, child[0], child[1])

    def stop(self):
        for component in self.component_configs:
            component.stop()
In this change we have added a component_configs dict to our pipeline. This dict will store the configuration of our components. We’ll use this dict to create our components on the thread later. We’ll also use this dict to find the children of a component. We’ll also create a components dict to store the instances of our components. We’ll use this dict to publish data to our components. We’ll also use this dict to stop our components later. We’ll also use a ThreadPoolExecutor to manage our threads. We’ll use this executor to start our components in different threads. We’ll also use this executor to publish data to our components in different threads. We’ll also use this executor to stop our components in different threads. We’ll also use the submit method to submit the start method of our components to the thread pool. This will start our components in different threads. This means that our components will run in parallel. We’ll also use the submit method to submit the on_data method of our components to the thread pool. This will publish data to our components in different threads. This means that our components will run in parallel. We’ll also use the submit method to submit the stop method of our components to the thread pool. This will stop our components in different threads. This means that our components will run in parallel.
Here is how our threaded app looks like:
from debugger import Debugger
from mock_camera import MockCamera
from pipeline import Pipeline
from slow_consumer import SlowConsumer
from threaded_pipeline import ThreadedPipeline

ThreadedPipeline() \
    .add_component(MockCamera, {"image_path": '/Users/bamdad/Downloads/pepsi-max.png'}) \
    .add_component(Debugger, parent=MockCamera) \
    .add_component(SlowConsumer, parent=MockCamera) \
    .start()

while True:
    pass
- Notice the white True, to keep the app running as the pipeline runs on a dfifferent thread.
I updated the output to just show the name of the componenet and the frame count and here is how the output looks like this:
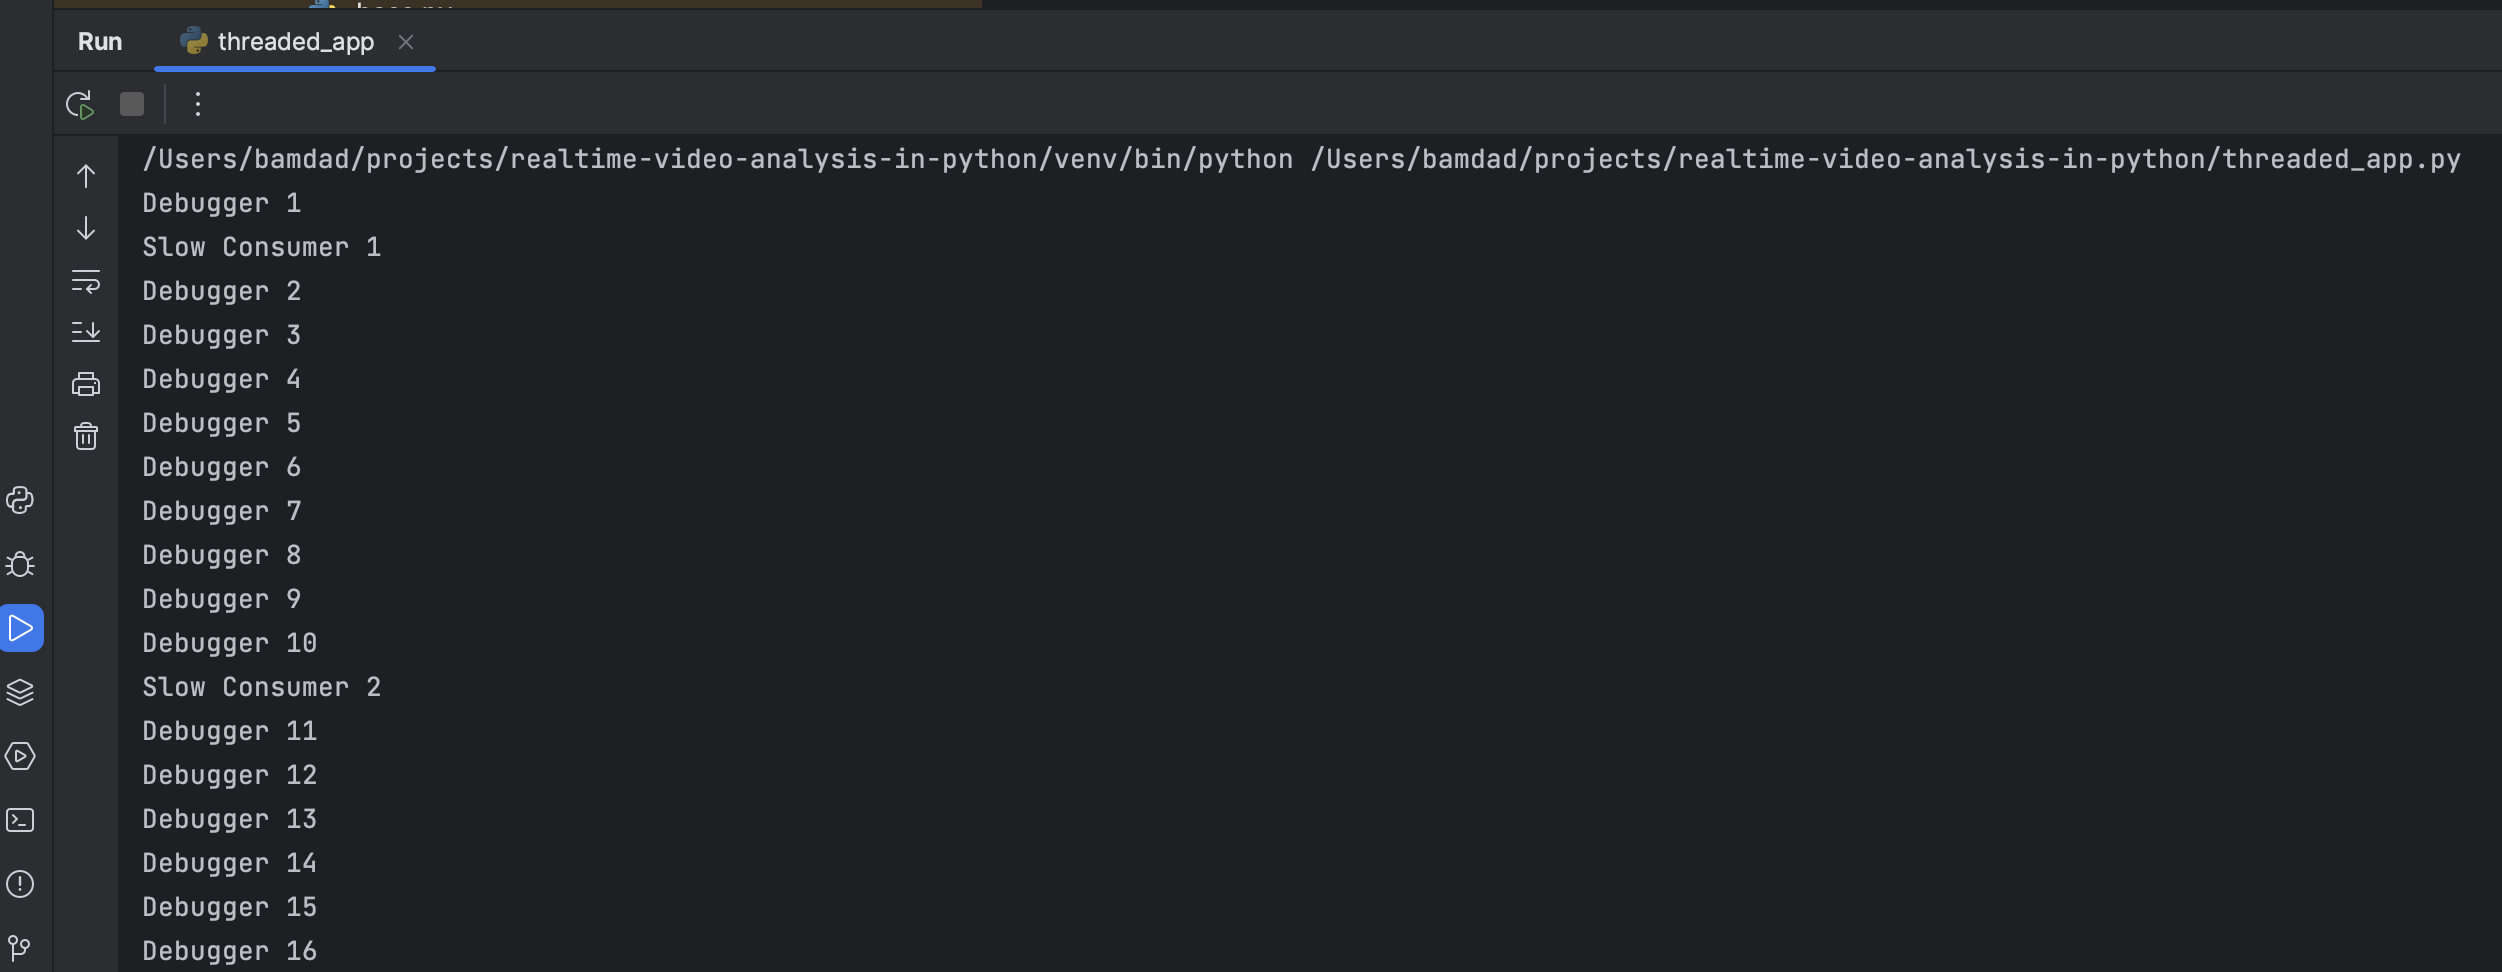
Not dropping frames
You can see the slow consumer consumes a lot slower than debugger which is expected as it has a blocking sleep which we placed there to simulate a heaving computation like model inference or image rendering. However the output we are seeing strage as I was hoping to see the slow consumer get the latests message when it wakes up from the sleep and drops the messages its unable to process. But it seems to be getting messages slower but still in the same order.
I was expecting to see something like this:
Debugger 1
Slow Consumer 1
Debugger 2
Debugger 3
Debugger 4
Debugger 5
Debugger 6
Debugger 7
Debugger 8
Debugger 9
Debugger 10
Slow Consumer 10 # <--- This is the what I was expecting to see.
Debugger 11
...
This means that the information that is passed to slow consumer, somehow is being stored somewhere and being queued to be executed on that thread when its done with the task at hand. Question is where is this mysterious place as we didn’t explicitly defined it? 🤔
The answer lies around the way we are using ThreadPoolExecutor and callback functions. When we are defining a callback to be called in the future using the submit or map function of the thread pool, we are creating something like a queue on the heap memory (want to know why not stack read this). This means if we increase the rate of production and have a limited memory on the device we’ll get MemoryError or in the case of callbacks RuntimeError: maximum recursion depth exceeded errors.
GIL and Threads
I was hoping to spend a bit more time on this post to get to the limitations of the GIL and find a way to demonstrate it but this post already got really long, but I’ll definately come back to this in the future. For now I’ll just leave you with this by David Beazley. This is a great video and I highly recommend watching it.
What’s coming up next?
In our next post we’ll go through implementing a pipeline using python multi processing to bypass the limitations of the GIL and increase our concurrency.
References
Feel free to checkout our part-3 brand of our github repo for the code for this post.