Real Time Video Analysis in Python Part 2 (Creating a simple pipeline)
Creating a simple Python pipeline for video analysis
Introduction
In our previous post we talked about how to do video analysis in python using OpenCV and Flask. We also talked about some of the limitations of this approach. In this post we’ll go through writing our first pipeline for video analysis in python. My aim is to show you where we’ll face challenges and how to overcome them.
Basic Piepline and Pipeline Component
Lets start by creating a basic pipeline object. This object will be responsible for initialising our components and connecting them together.
There are different ways to connect components together:
- Message queue: This is a very common approach in the industry. Its especially powerfull when working with multi processes. Queue and Multi process pipes and queues in python are good examples of this approach. Also Kafa, RabbitMQ, and Redis are good examples of this approach.
- Pub/sub approach: This is also a very common approach in the industry. This is very similar to the message queue approach checkout PyPubSub implementation.
- Emitter approach: This is an approach where one component emits an event and other components can subscribe to that event checkout emitter.io or emitter pip package.
- Shared Memory: This is a very common approach in high performance computing where one component writes to a shared memory and other components read from it. Python Shared memory and Plasma in RayCore are good examples of this approach
- Message passing: This is also a very common approach in the industry for HPC. ZeroMQ, mpi4py and NNG are good example of this approach.
- Callback approach: This is a very simple approach where one component calls a callback function on another component. This is very similar to the emitter approach. We’ll start with this approach for now.
Throughout this series we’ll try to evaluate some of these approaches and see which one works best for us. For now we’ll use the callback approach. We’ll create a Component class that will be the base class for all of our components.
First Pipeline implementation
We’ll also use this object to start and stop the pipeline. Here is what the code could look like:
We store a dict of components in the pipeline and when we add a component we can specify a parent component. This will allow us to create a tree like structure for our pipeline. We’ll also add a publish method to our pipeline that will be used to publish data to the pipeline. Here is what the code looks like:
class Pipeline:
    def __init__(self):
        self._components = {}

    def add_component(self, component: Component, parent=None):
        if parent is None:
            self._components[component] = []
        else:
            self._components[parent].append(component)
        return self

    def publish(self, component: Component, data):
        for child in self._components.get(component, []):
            child.on_data(data)

    def start(self):
        for component in self._components:
            component.set_pipeline(self)
            component.start()

    def stop(self):
        for component in self._components:
            component.stop()
And here is how our Component class looks like:
from abc import ABC, abstractmethod

class Component(ABC):
    def __init__(self, name: str):
        self._name = name
        self._pipeline = None

    @property
    def name(self):
        return self._name

    def set_pipeline(self, pipeline):
        self._pipeline = pipeline

    def publish(self, data):
        self._pipeline.publish(self, data)

    def on_data(self):
        pass

    @abstractmethod
    def start(self):
        pass

    @abstractmethod
    def stop(self):
        pass
Creating our MockCamera Component
In order to experiment and also bypass the hardware restricitons with USB or Network cameras, we’ll create a mock camera component. This component will produce a static image by publishing the image to the pipeline and increasing the frame counter. The FPS is also configurable. Here is what the code looks like:
import cv2
import time
from component import Component

class MockCamera(Component):
    def __init__(self, name, image_path, fps=30):
        super().__init__(name)
        self._image_path = image_path
        self._fps = fps
        self._running = False

    def start(self):
        self._running = True
        self._capture()

    def stop(self):
        self._running = False

    def _capture(self):
        while self._running:
            image = cv2.imread(self._image_path)
Creating a Debugger Component
We’ll also create a simple component that will print the frame count. We’ll add more features to this component later on.
from component import Component


class Debugger(Component):
    def __init__(self):
        super().__init__(name="Debugger")

    def start(self):
        pass

    def stop(self):
        pass

    def on_data(self, data):
        print(data)
Chaining components together
Now that we have our components ready, lets chain them together and see how it works. We’ll create a pipeline and add our components to it.
from debugger import Debugger
from mock_camera import MockCamera
from pipeline import Pipeline

camera = MockCamera('example.png')
debugger = Debugger()
Pipeline() \
    .add_component(camera) \
    .add_component(debugger, parent=camera) \
    .start()
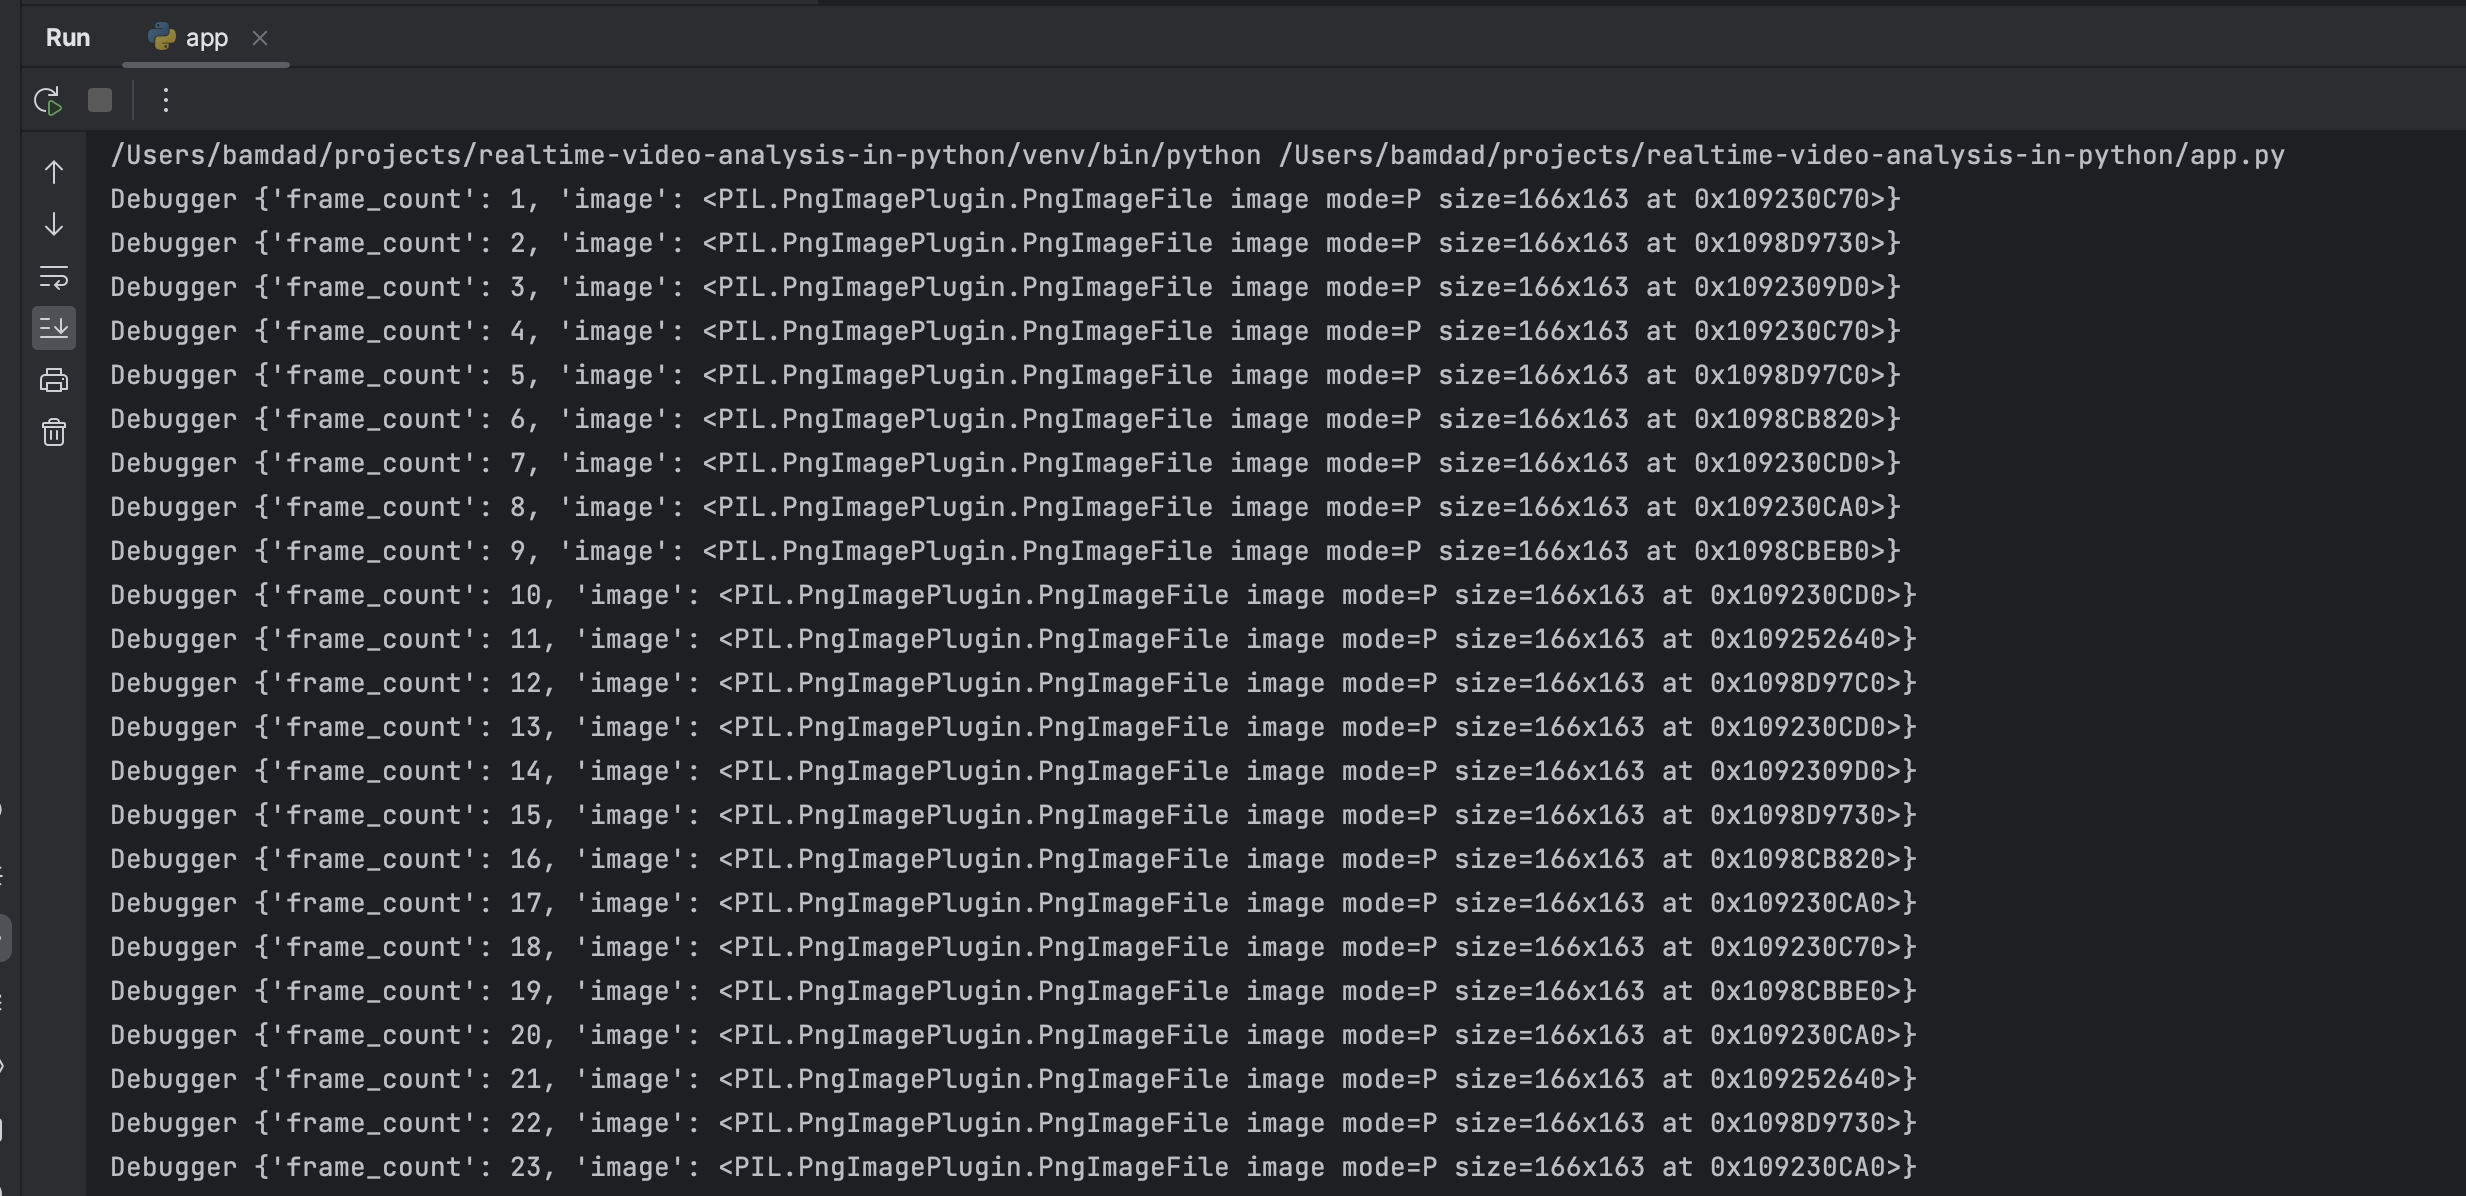
If you run this code you should see the frame count printed to the console along with the PIL Image object.
What is wrong with this implementation?
If we have a slow consumer anywhere in this pipeline, it will slow down the whole pipeline. This is because we are using a synchronous approach and everything is running on the same thread. We can fix this by running each component on its own thread. We’ll also use a queue to pass data between components. We’ll evaulate both of these approaches in the next post. But for now have a look an an example of slow consumer:
import time

from component import Component


class SlowConsumer(Component):
    def __init__(self):
        super().__init__(name="SlowConsumer")

    def start(self):
        pass

    def stop(self):
        pass

    def on_data(self, data):
        time.sleep(1)
        print("Slow Consumer", data)
Lets wire them all together and see what happens:
from debugger import Debugger
from mock_camera import MockCamera
from pipeline import Pipeline
from slow_consumer import SlowConsumer

camera = MockCamera('example.png')
debugger = Debugger()
slow_consumer = SlowConsumer()
Pipeline() \
    .add_component(camera) \
    .add_component(slow_consumer, parent=camera) \
    .add_component(debugger, parent=camera) \
    .start()
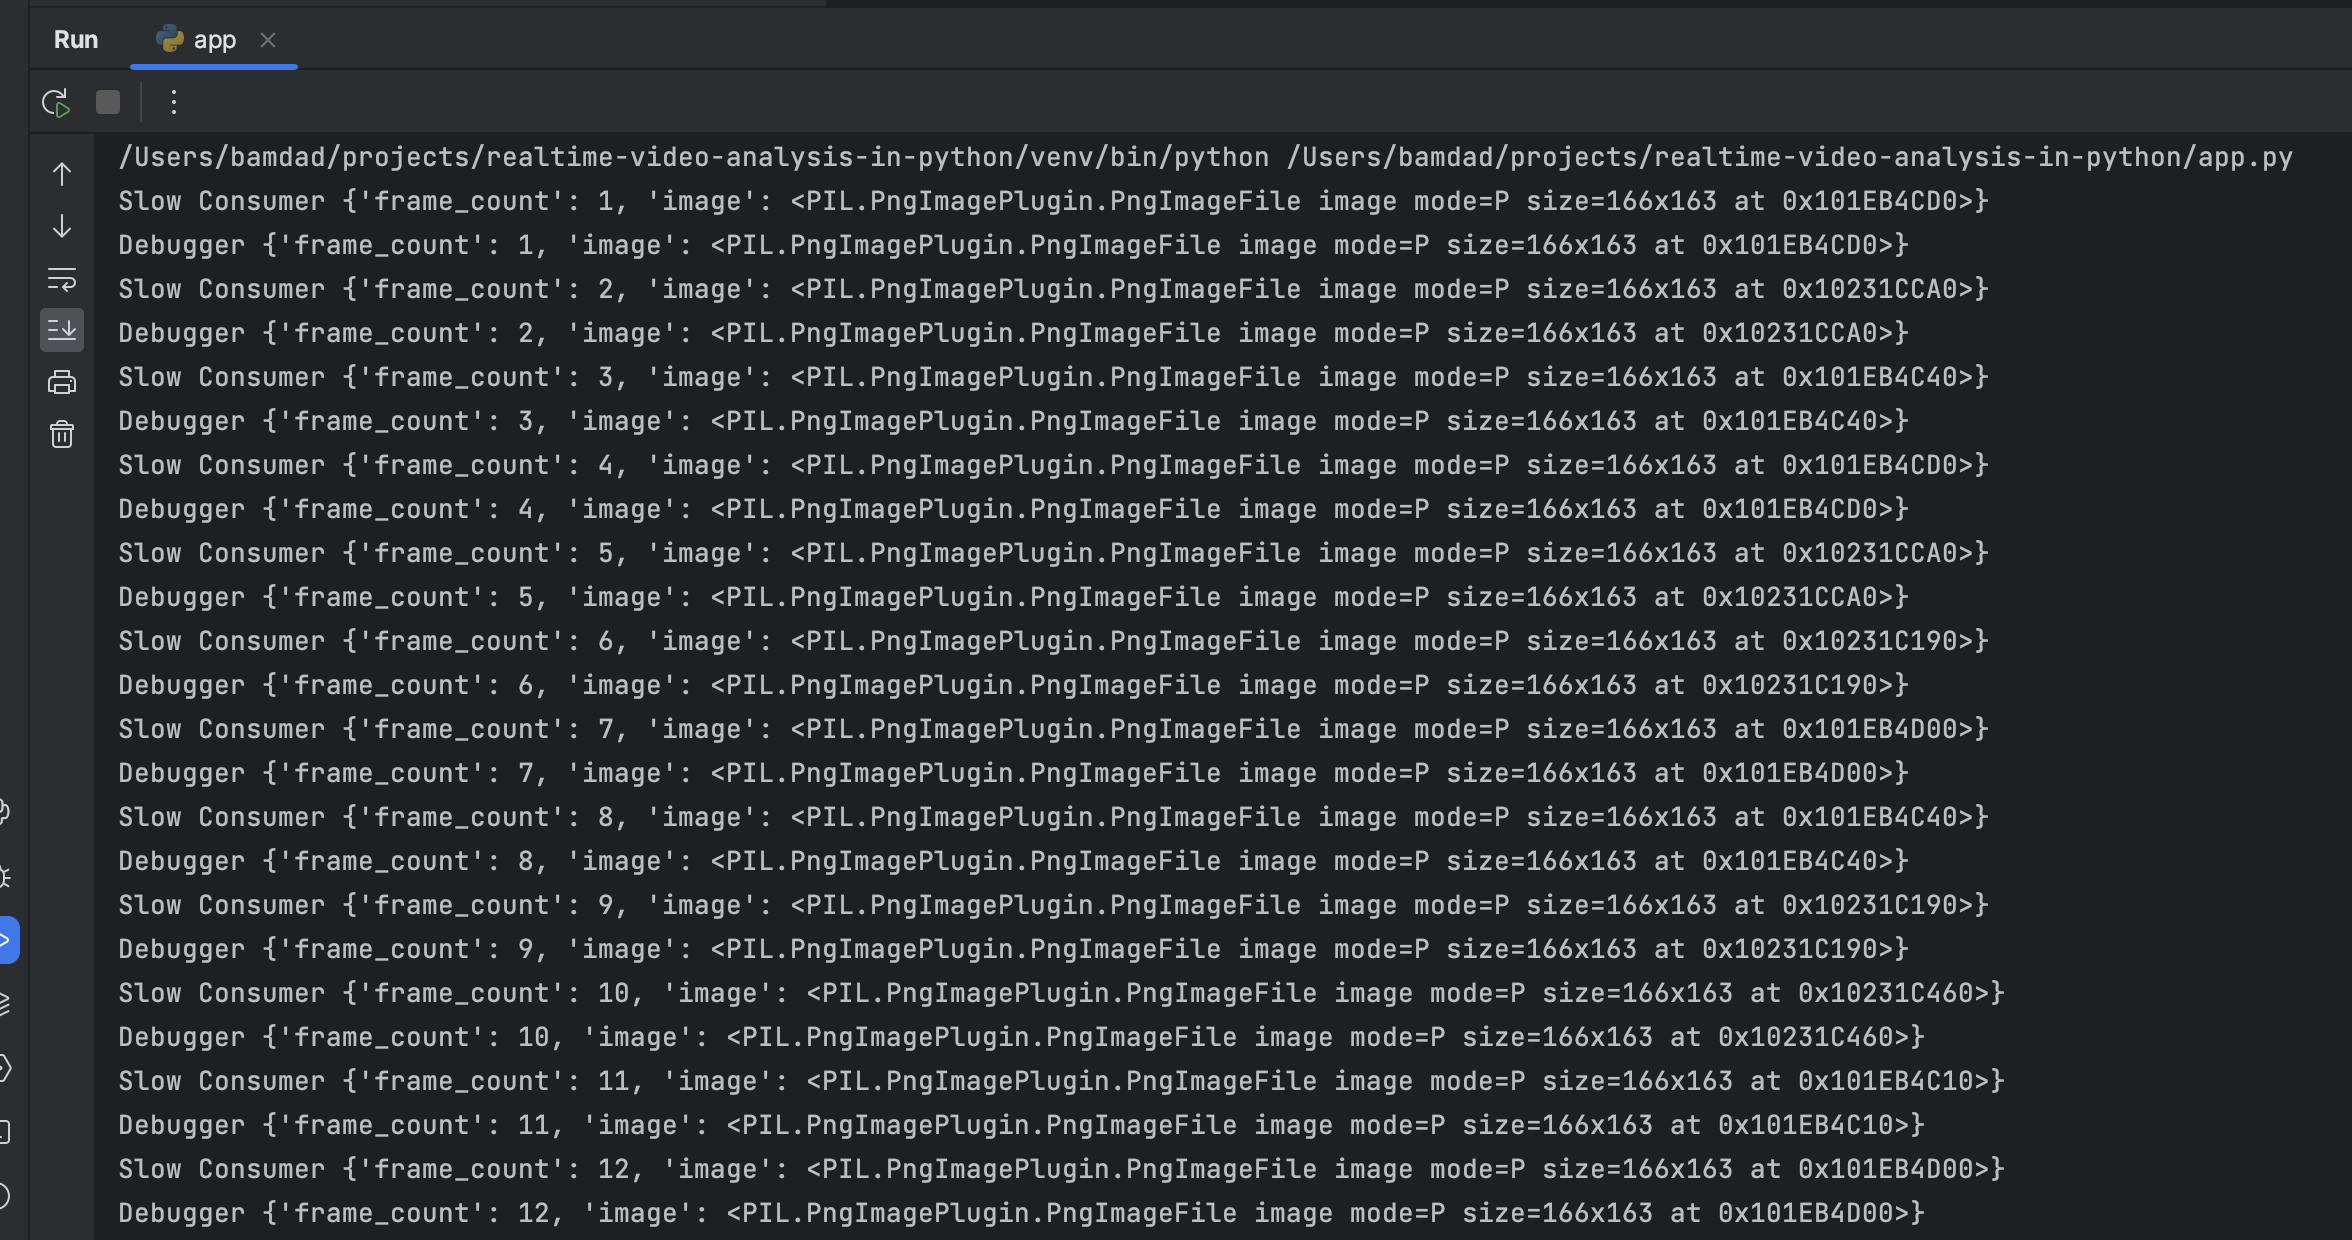
Although the Debugger component is not doing slow, it will still be blocked by the SlowConsumer component. You can see this behaviour in the following image where both slow consumer and debugger are receiving the same frame count which is around 1 FPS due to the slow consumer:
What is next?
In the next post I’ll go through implementing a multi threaded pipeline and a pipeline with queues. I’ll also talk about some of the challenges that we’ll face and how to overcome them as part of that we’ll learn about the mysteries of Python GIL and its limitations. Oh also I should start writing some tests for this code.
Stay tuned!
References
The code for this post is available on GitHub. Make sure to checkout the part-2 branch.